Broadly speaking, any dedicated hardware and software system with a microprocessor can be called an embedded system. It is a special computer system embedded in the object system. It is application-oriented, computer-based, software and hardware can be tailored to meet the strict requirements of the application system for functions, reliability, cost, size, power consumption and other special computer systems. . Currently very popular ARM cores are ARM7TDM1, S trong ARM, ARM 7 2 0 T, ARM 9 TDM 1, ARM9 20T, ARM940T, ARM946T, ARM966T, ARM10TDM1 and so on. The CPU of the target board discussed in this article is the Samsung S3C2410 chip of the ARM920T core.
ARM9 series microprocessors are mainly used in wireless devices, instrumentation, security systems, set-top boxes, high-end printers, digital cameras and digital cameras. It includes ARM920T, ARM922T and ARM940T, which are widely used in PDA, mobile communication, routers, industrial control and other fields.
2. Embedded Web server implementation principleAn embedded web server refers to the introduction of a web server into a field embedded device and resides in a limited code space. Compared with traditional web applications, it simplifies the system structure and integrates information collection and information dissemination into embedded devices in the field. With the support of the corresponding software and hardware platform, the web server embedded in the embedded device can provide a unified browser-based operation and control to any legitimate user accessing the network under its standard interface format and communication protocol. Interface, at this time the browser becomes the front panel of the device. Currently in the field of embedded applications, embedded systems are transformed into embedded WebServers, which can be roughly divided into two implementation schemes:
(1) Internet access of embedded devices based on gateway server;
(2) Internet access of embedded devices directly implementing TCP/IP. The second implementation scheme is adopted in this topic.
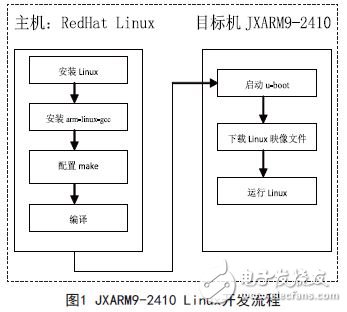
3. Implementation of system functions3.1 Development Process
Figure 1 shows the experimental environment and development process used in this topic. 1 Install the Linux distribution package and the cross compiler armlinux-gCC under the RedHat Linux operating system of the host; 2 Configure the Linux (makem enuconfig), and select the relevant configuration for the project; 3 Compile and generate the Linux image file zlmage; The file is downloaded to the target board and executed by the u-boot tftp command. This will be introduced in the following content.
3.2 Loading the Linux kernel image
3 . 2 . 1 Connect the serial port 0 of JXARM 9 - 2 4 1 0 to COM 1 of the PC. The network card of JXARM 9 - 2 4 1 0 and the network card of the PC are connected by direct-connected network cable, or JXARM 9 - 2 4 10 and PC use ordinary network cable to access the same LAN. The IP of the ARM experiment box is 192.168.1.45, the IP of the Linux under the virtual machine is set to 192.168.1.180, and the security level is set to no firewall. The host IP is set to 192.168.1.145.
3.2.2 Power on the JXARM9-2410. Under normal circumstances, the bootloader menu interface will be displayed in the terminal DNW. In the bootloader, follow the prompts to load and enter CTRL+C to enter the Linux command line. If there is a failure, there may be several problems:
1) When loading the kernel, the total is "TT". This is because the tftp server is not connected successfully. Enter the PINg 192.168.1.180 command in uboot. If the prompt is not alive, please check if the network is properly connected: use the network cable correctly or not. The IP addresses of the host and target are not on the same subnet. Here, the host and target are required to be on the 192.168.1.xxx network segment, and the last bit cannot be the same; if the prompt is alive and still prompt "TT", please check the Windows firewall settings, turn off the firewall, if still not, please Close other programs started in the system, such as anti-virus software.
2) Prompt "PACket too big", this problem is caused by uboot receiving illegal packets. A small number of such prompts will not affect the kernel loading. If the kernel fails to load, please check as follows: 1 Use direct network cable connection Computer and experiment box; 2 Close all network related programs opened in the computer.
3.3 Boa Web Server Establishment
Establishing a Boa web server involves the following steps:
3.3.1 Downloading Boa Source Code
The source code for the Boa web server can be downloaded from. The files downloaded in this article are:
Boa-0.94.13.tar.gz, the current version.
3.3.2 Installing and Compiling the Boa Source Code 1) Copy the Boa source code downloaded from Windows to the /home/cvtech/jx2410/examples/ directory via File Sharing in VMware Tools.
2) Install the source code: Generate the Makefile #./configure.
3) Modify the Makefile, find CC=gcc, change it to CC = arm - linux - gcc, find CPP = gcc - E, change it to CPP = arm - linux -gcc-E, and save and exit.
4) Run make to compile, and the Boa file will be generated in the boa/SRC directory. This file is the Boa Web server executable file. Stripping the debug information, the resulting final program is only about 60KB in size.
3.3.3 Configuring the Boa Web Server to Support the Execution of CGI Programs
Boa will load a configuration file boa when it starts.
Conf, before the Boa program runs, you must first edit the file and place it in the default directory defined by the SEVER-ROOT macro definition in the src/defines.h file, or specify the parameter "-c" when starting Boa. Boa.
The loading directory of the conf.
Users can modify boa.conf according to their needs, but you must ensure that other auxiliary files and settings must match the configuration in boa.conf, otherwise Boa will not work properly. In the above example, we also need to create the log file directory /var/log/boa and copy the mime.types file to the /etc directory. The mime.types file is used to indicate the MIME type corresponding to different file extensions. Generally, you can copy one directly from the Linux host, and most of them are also in the host's /etc directory.
3.4 Testing of system functions
After transplanting the Boa server, it is tested whether it can work normally, whether the static HTML page can be accessed normally, and whether the dynamic web page can be accessed normally. In this topic, the NFS method will be used for testing.
Test the web server. The Boa test development environment is shown in Figure 2:
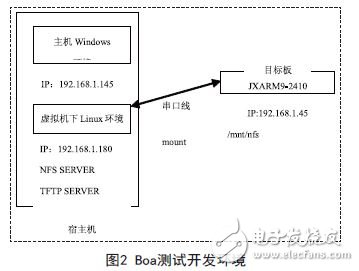
You can copy the /etc directory on the embedded target system to the host's NFS share directory, and then remount the etc under the NFS share directory to the /etc directory on the target system. In this way, various configuration files in the etc directory can be modified on the host and immediately effective on the target system.
The IP address of the JXARM9-2410 was previously set to 192.168.1.45, and the configured boa has been pre-programmed in the JFFS2 file system of JXARM9-2410.
The conf file is located in the /mnt/jffs2/etc/ directory.
Start JXARM9-2410 Linux and follow these steps:
a) Copy the Boa executable file to the tftpboot directory;
b) Mount the tftpboot directory under the host to the nfs directory of the target board;
c) Start the Boa server.
According to the configuration of boa.conf above, at this time, the mnt/jffs2/web directory of the target board includes the index.html of the test main page, the directory IMAGES for storing various images, and the storage directory cgi-bin of the CGI script.
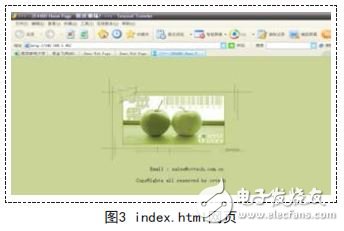
After booting, test the Boa server and access the following URL in the web browser: If the network connection is normal and the Boa startup is normal, you can see /mnt/jffs2/web/index.
The html page, as shown in Figure 3, indicates that the static HTML page passed the test. You can modify the page and replace it with the one you want, then refresh the browser display.
3.5 Dynamic Web Page Testing
In the JXARM9-2410 Linux command line, enter the following command to mount the host's tftpboot directory to the nfs directory of the target board:
The above command first places the written CGI program cgi_test in the cgi-bin directory defined by boa.conf.
The path in this topic is / mnt / jffs 2 / web / cgi -bin/, and then start the boa server. CGI programs can be executed correctly.
ZGAR bar 2000 Puffs
ZGAR electronic cigarette uses high-tech R&D, food grade disposable pod device and high-quality raw material. All package designs are Original IP. Our designer team is from Hong Kong. We have very high requirements for product quality, flavors taste and packaging design. The E-liquid is imported, materials are food grade, and assembly plant is medical-grade dust-free workshops.
Our products include disposable e-cigarettes, rechargeable e-cigarettes, rechargreable disposable vape pen, and various of flavors of cigarette cartridges. From 600puffs to 5000puffs, ZGAR bar Disposable offer high-tech R&D, E-cigarette improves battery capacity, We offer various of flavors and support customization. And printing designs can be customized. We have our own professional team and competitive quotations for any OEM or ODM works.
We supply OEM rechargeable disposable vape pen,OEM disposable electronic cigarette,ODM disposable vape pen,ODM disposable electronic cigarette,OEM/ODM vape pen e-cigarette,OEM/ODM atomizer device.

Disposable Vape, bar 2000puffs, ZGAR bar disposable, Disposable E-cigarette, OEM/ODM disposable vape pen atomizer Device E-cig
ZGAR INTERNATIONAL(HK)CO., LIMITED , https://www.zgarvapor.com