Most engineers will not choose Arduino when they see it in the toolbox, because it seems too simple to be useful or not capable of certain functions. They are correct in most cases, but this is not what we are going to discuss here. Some people don’t realize that this low-cost development board is a very powerful conversion tool. Here are three Arduinos. Powerful but often overlooked use:

Digital logic analyzer
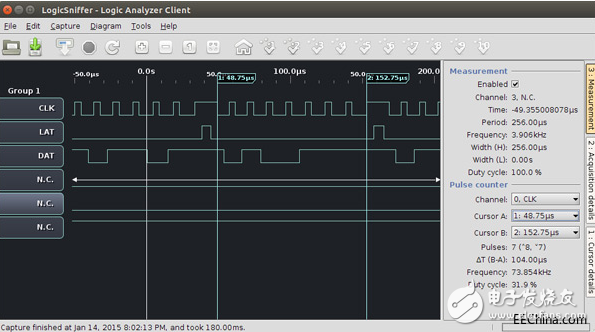
The Open Source Logic Sniffer (OLS) is a simple software tool that implements the functional characteristics of a digital logic analyzer (Figure 1). The OLS client is based on the Java language and can run on most operating systems. Due to its simple serial protocol, many open source tools such as Bus Pirate, Logic Pirate, of course, including Arduino, provide basic support for OLS. There are no external components (excluding wires) and Andrew Gillham's open source code. Program settings and turn it into a digital logic analyzer.

Figure 1: Open Source Logic Sniffer (OLS) is a simple software tool that implements the functional characteristics of a digital logic analyzer
Listed below are the functional features of ATmega328-based Arduino for everyone to use:
Maximum 4Mhz sampling rate
1024 samples
6 channels
Muting trigger
Forward/backward recording with adjustable scale
Act as a series of parameter measurement tools: frequency, period, duty cycle, etc.
It may not have any special features, but sometimes it can provide you with enough support. I often use Arduino or FPGA to verify the communication protocol and some functional codes.
AVR programmer
For many college students, the price often affects our decision to a large extent. In this example, I mean that you need to buy a programmer for the microcontroller system. Maybe you want to permanently integrate this function on the PCB, or just want to see how to "manually" program the AVR device. It seems that this amazing realization of Arduino makes me like it very much.
This process is very simple. In fact, this project (sketch) has now been integrated into all new versions of Arduino IDE. The specific operations are as follows:
• Open the IDE, select File-"Example-"ArduinoISP
• Compile and upload the project to the development board
• After the above operations are completed, you can use Arduino's Pin10, 11, 12 and 13 pins (respectively corresponding to RESET/MOSI/MISO/SCK) to program your AVR device. The only thing left is to connect these Add the flag to the makefile or use the avrdude command line:
• -p –c avrisp –b 19200
UART (serial port) to USB
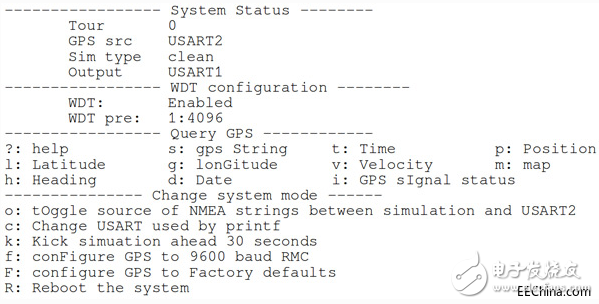
I know this seems a bit obvious. The FTDI USART-to-USB chip is integrated on the Arduino board. For Arduino products that lead to most MCU pins, such as Arduino UNO R3, you can carefully take out the ATmega DIP chip from the socket. You can use the serial pins (RX and TX) for other functions. I find that I often do this. I like to program the option menu into my microcontroller program. Sometimes a simple interface can make real-time The running system changes the mode or requested data, thus saving you hours of debugging time. Figure 2 is a very good example of this kind of programming menu. This is the programming menu of the campus bus tracking system I designed.

Figure 2: Customize the menu for the bus tracking system
If you own such a board, who would know that it has so many functions like a Swiss army knife? I hope we have encouraged everyone to pick up their Arduino again and start exploring new areas in the electronic world. If you have done some cool things with these tools, you might as well share them in the comments below.
Daniel is a computer engineering student at the University of Pennsylvania. He likes embedded system design and digital logic system problem testing. He is currently doing work on open source smart home automation system hardware, focusing on security and portability.
Stanard IDC Connector
Stanard IDC connector
ATKCONN ELECTRONICS CO., LTD , https://www.atkconn.com